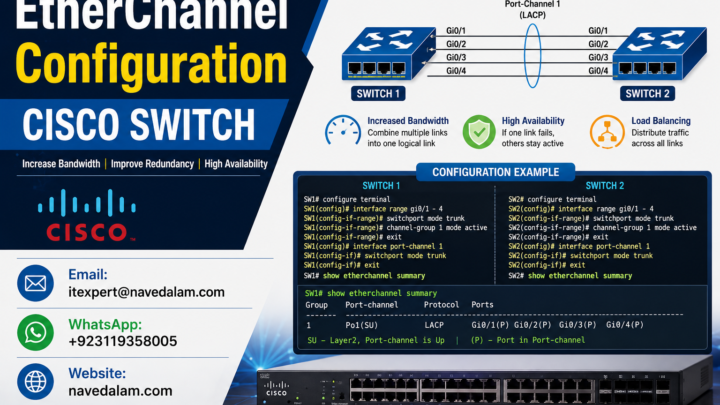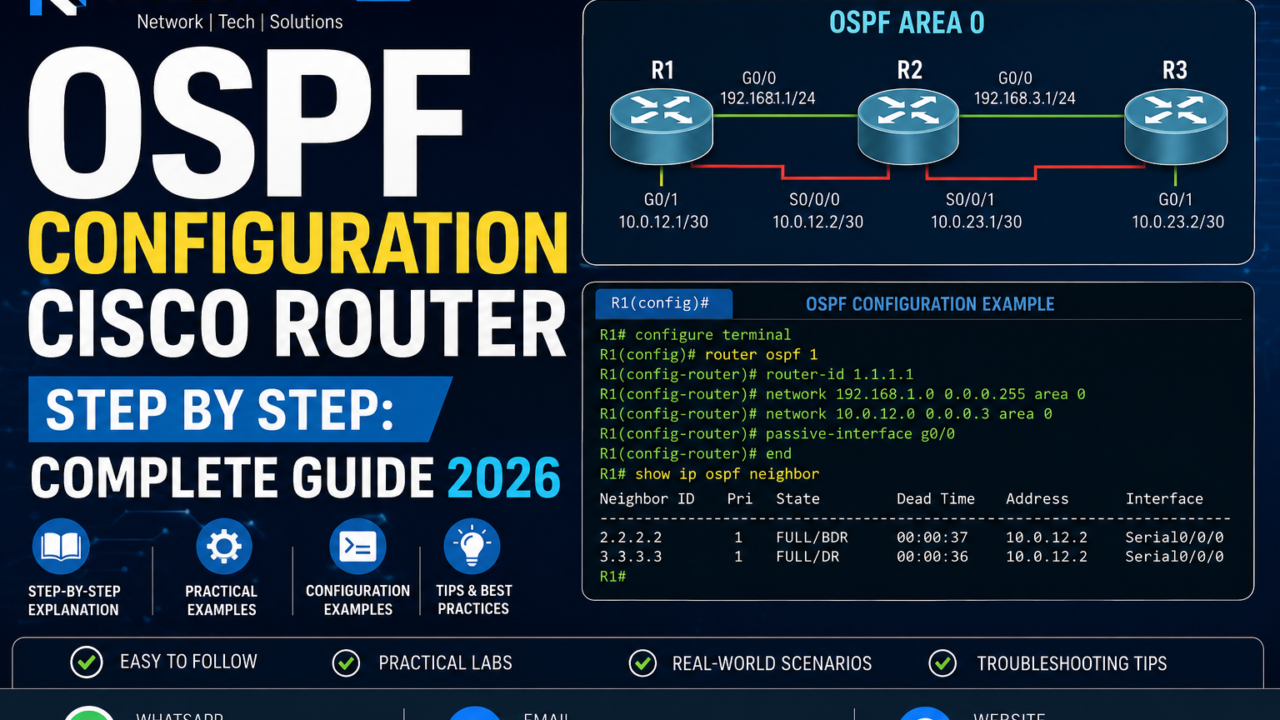
router ospf [process-id] to enable the process, router-id [x.x.x.x] to set a stable identifier, and network [address] [wildcard] area 0 to activate OSPF on interfaces. A complete single-area OSPF deployment on Cisco IOS 15.x takes under 15 minutes and forms a Full adjacency within seconds of the final network statement.OSPF configuration Cisco router step by step is one of the most searched skills in enterprise networking — and for good reason. Whether you are preparing for CCNA, deploying a branch office network, or replacing RIP in a growing infrastructure, knowing how to configure OSPF step by step on a Cisco router determines whether your network converges in seconds or fails silently. OSPF (Open Shortest Path First) is the default IGP for enterprise environments worldwide, standardised under RFC 2328 and supported on every major routing platform.
I have deployed OSPF configuration on Cisco routers across dozens of enterprise environments — from two-router branch sites to multi-area designs spanning three data centres. The protocol itself is rock-solid. Every failure I have encountered in production traced back to one of five misconfiguration patterns, all covered in the troubleshooting section of this guide.
By the end you will be able to perform complete OSPF configuration on a Cisco router step by step, verify neighbour adjacency with show ip ospf neighbor, tune cost metrics, understand DR/BDR election, and resolve the most common causes of OSPF neighbour not forming.
Table of Contents
- Why OSPF Is the Standard for Enterprise Routing
- Understanding OSPF Architecture and Key Concepts
- Lab Prerequisites and Network Topology
- OSPF Configuration Cisco Router Step by Step
- Verification Commands
- OSPF Cost Metric Explained
- DR/BDR Election on Multi-Access Networks
- OSPF vs EIGRP: Which Should You Use?
- Real-World OSPF Deployment Scenario
- Troubleshooting: OSPF Neighbour Not Forming
- OSPF Best Practices
- FAQ: People Also Ask
- Conclusion
Why OSPF Is the Standard for Enterprise Routing
OSPF (Open Shortest Path First) is a link-state interior gateway protocol. Unlike distance-vector protocols such as RIP, OSPF builds a complete map of the network topology using Link State Advertisements (LSAs) and calculates the shortest path to every destination using Dijkstra’s algorithm. The full technical specification is published in RFC 2328 by the IETF.
In enterprise environments, OSPF is preferred for four concrete reasons: it converges faster than RIP, it supports VLSM and CIDR natively, it scales to thousands of routes across hierarchical areas, and it runs on every routing platform — Cisco, Juniper, Arista, and open-source alike. When any non-Cisco hardware exists in your network, OSPF is the only open-standard IGP that works across all of them. Cisco’s own documentation for IP routing and OSPF confirms it as the recommended IGP for scalable enterprise deployments.
From a career perspective, OSPF configuration on Cisco router skills are consistently listed in enterprise RFPs and network engineer job requirements. It is the IGP running in the vast majority of production networks I have worked on across Pakistan and internationally.
Understanding OSPF Architecture and Key Concepts
Before running a single Cisco OSPF router command, build a clear mental model of what the protocol is doing underneath the CLI.
Key Components
- Router ID (RID): A 32-bit identifier for each OSPF router, formatted as an IP address. Cisco auto-selects the highest loopback IP, or highest active interface IP if no loopback exists. Always set it manually in production — automatic selection causes instability.
- Area: A logical grouping of routers sharing the same Link State Database. Area 0 (backbone) is mandatory — all other areas must connect to it directly or via a virtual link.
- LSA (Link State Advertisement): The packet OSPF routers use to share topology information. Type 1 (Router LSA), Type 2 (Network LSA), Type 3 (Summary LSA), and Type 5 (External LSA) are the most common types you will encounter.
- LSDB (Link State Database): The complete topology map built from received LSAs. All routers in an area must have an identical LSDB before routing is correct. Verify with
show ip ospf database. - SPF Algorithm: Dijkstra’s shortest path first — runs after LSDB is complete and builds the routing table from calculated shortest paths. SPF runs are CPU-intensive in large networks — area design exists to limit their scope.
- Hello Protocol: OSPF routers discover neighbours by multicast hello packets every 10 seconds on broadcast networks. Dead interval defaults to 40 seconds. These must match between neighbours or adjacency never forms.
OSPF Neighbour States
Down > Init > 2-Way > ExStart > Exchange > Loading > FullTwo routers must reach Full state before exchanging routing information. On broadcast Ethernet segments, DROther routers only reach Full with the DR and BDR — remaining in 2-Way with each other. This is expected OSPF behaviour, not a fault. The most common question I receive on OSPF configuration Cisco router deployments is whether 2-Way state between non-DR routers is a problem — it is not.
Lab Network Topology
[R1]---Gi0/0---10.0.12.0/30---Gi0/0---[R2]
 |                                        |
Gi0/1                                  Gi0/1
 |                                        |
10.0.1.0/24                         10.0.2.0/24
(LAN R1)                            (LAN R2)

Loopback0: R1=1.1.1.1  R2=2.2.2.2
All interfaces in OSPF Area 0
Lab Prerequisites and Network Topology
- Cisco IOS 15.x or later (or Cisco Modeling Labs / GNS3 / EVE-NG)
- Two or more Cisco routers, physical or virtual
- Console or SSH access to each router
- Basic IOS CLI familiarity — interface configuration and IP addressing
- IP addresses assigned and interfaces in up/up state before starting OSPF
OSPF Configuration Cisco Router Step by Step
Follow these five phases in order. Each phase builds on the previous one. Skipping Phase 1 is the single most common cause of instability in production OSPF deployments.
Phase 1: Configure the Loopback and Set Router ID
Always configure a loopback interface first and set the router ID manually before enabling OSPF. Relying on automatic RID selection causes unpredictable behaviour when an interface goes down — the RID changes mid-deployment, breaks existing adjacencies, and triggers an SPF recalculation across the entire area. This is the most impactful step in OSPF configuration on any Cisco router.
! On R1 - configure loopback for stable Router ID
R1(config)# interface loopback 0
R1(config-if)# ip address 1.1.1.1 255.255.255.255
R1(config-if)# no shutdown
R1(config-if)# exit

! On R2
R2(config)# interface loopback 0
R2(config-if)# ip address 2.2.2.2 255.255.255.255
R2(config-if)# no shutdown
R2(config-if)# exit
! Verify loopback is up before proceeding
R1# show interfaces loopback 0
Loopback0 is up, line protocol is up
Internet address is 1.1.1.1/32Phase 2: Enable the OSPF Process and Set Router ID
The OSPF process ID is locally significant — it does not need to match between routers. Use a consistent number across your organisation for operational clarity. After enabling the Cisco router OSPF process, set the router ID immediately before advertising any networks.
! On R1
R1(config)# router ospf 1
R1(config-router)# router-id 1.1.1.1
R1(config-router)# exit

! On R2
R2(config)# router ospf 1
R2(config-router)# router-id 2.2.2.2
R2(config-router)# exitclear ip ospf process to take effect. Without clearing, the old RID stays active until the next router reload.Phase 3: Advertise Networks with the OSPF Network Command
The network command activates OSPF on any interface whose IP address falls within the specified range. The wildcard mask is the bitwise inverse of the subnet mask. This is the step that actually triggers neighbour discovery and LSA exchange on each Cisco router OSPF process.
! On R1 - advertise all interfaces into Area 0
R1(config)# router ospf 1
R1(config-router)# network 10.0.12.0 0.0.0.3 area 0
R1(config-router)# network 10.0.1.0 0.0.0.255 area 0
R1(config-router)# network 1.1.1.1 0.0.0.0 area 0

! On R2
R2(config)# router ospf 1
R2(config-router)# network 10.0.12.0 0.0.0.3 area 0
R2(config-router)# network 10.0.2.0 0.0.0.255 area 0
R2(config-router)# network 2.2.2.2 0.0.0.0 area 0
Within seconds you should see the adjacency form in the syslog:
%OSPF-5-ADJCHG: Process 1, Nbr 2.2.2.2 on GigabitEthernet0/0 from LOADING to FULL, Loading DonePhase 4: Alternative — Enable OSPF Directly on Interface
On IOS 12.4 and later, you can activate OSPF directly per interface instead of using the network statement. This is cleaner, avoids wildcard mask errors, and is the approach Cisco now recommends in their OSPF design guide.
R1(config)# interface GigabitEthernet 0/0
R1(config-if)# ip ospf 1 area 0

R1(config)# interface GigabitEthernet 0/1
R1(config-if)# ip ospf 1 area 0

R1(config)# interface loopback 0
R1(config-if)# ip ospf 1 area 0
Phase 5: Configure Passive Interface on LAN-Facing Ports
LAN-facing interfaces should never send OSPF hello packets to end devices. The passive-interface command suppresses hellos while still advertising the network into the OSPF topology. This is a mandatory step in any production OSPF configuration on Cisco routers — skipping it causes unnecessary hello traffic on LAN segments and opens a security risk.
R1(config)# router ospf 1
R1(config-router)# passive-interface GigabitEthernet0/1

R2(config)# router ospf 1
R2(config-router)# passive-interface GigabitEthernet0/1
OSPF Verification Commands
These four commands cover 90% of OSPF verification needs. Run them in order after completing OSPF configuration on your Cisco routers.
! 1. Verify neighbour adjacency - state must show FULL
R1# show ip ospf neighbor

Neighbor ID   Pri   State       Dead Time   Address       Interface
2.2.2.2         1   FULL/DR     00:00:36    10.0.12.2     GigabitEthernet0/0

! 2. Verify OSPF routes in the routing table
! O = intra-area  O IA = inter-area  O E2 = redistributed external
R1# show ip route ospf
O    10.0.2.0/24 [110/2] via 10.0.12.2, 00:05:12, GigabitEthernet0/0
O    2.2.2.2/32  [110/2] via 10.0.12.2, 00:05:12, GigabitEthernet0/0

! 3. Verify OSPF process details and area count
R1# show ip ospf
 Routing Process "ospf 1" with ID 1.1.1.1
 Number of areas: 1 normal 0 stub 0 nssa

! 4. Verify per-interface OSPF parameters (timers, cost, DR/BDR state)
R1# show ip ospf interface GigabitEthernet0/0
OSPF Cost Metric Explained
OSPF uses cost as its routing metric. Cost is calculated as Reference Bandwidth / Interface Bandwidth. The default reference bandwidth is 100 Mbps — which assigns a cost of 1 to any interface at 100 Mbps or faster, including 1 Gbps and 10 Gbps links. This is a critical misconfiguration in modern networks: OSPF cannot distinguish between a 100M link and a 10G link without this fix.
Always change the reference bandwidth before advertising routes in any OSPF configuration on Cisco routers that include Gigabit or faster interfaces:
! Set reference bandwidth to 10 Gbps - apply on ALL routers in the domain
R1(config)# router ospf 1
R1(config-router)# auto-cost reference-bandwidth 10000

! Resulting costs with 10G reference bandwidth:
! 10G interface  = 10000/10000 = cost 1
! 1G interface   = 10000/1000  = cost 10
! 100M interface = 10000/100   = cost 100

! Override cost manually per interface when needed
R1(config)# interface GigabitEthernet0/0
R1(config-if)# ip ospf cost 10
! Verify the interface cost
R1# show ip ospf interface GigabitEthernet0/0
Cost: 10
Transmit Delay is 1 sec, State DR, Priority 1DR/BDR Election on Multi-Access Networks
On Ethernet segments with three or more OSPF routers, OSPF elects a Designated Router (DR) and Backup Designated Router (BDR) to reduce LSA flooding. DROther routers form Full adjacency only with the DR and BDR — staying in 2-Way state with other DROthers. This is by design.
Election order: highest OSPF interface priority (default 1) → highest Router ID as tiebreaker. Controlling DR/BDR election is a key step in any advanced OSPF configuration Cisco router deployment with multiple routers on shared segments.
! Force R1 to become DR - set highest priority
R1(config)# interface GigabitEthernet0/0
R1(config-if)# ip ospf priority 100

! Exclude R3 from DR/BDR election entirely
R3(config)# interface GigabitEthernet0/0
R3(config-if)# ip ospf priority 0clear ip ospf process to force immediate re-election.OSPF vs EIGRP: Which Should You Use?
| Criteria | OSPF | EIGRP |
|---|---|---|
| Standard | Open (RFC 2328) — multi-vendor | Cisco proprietary |
| Scalability | Excellent — areas reduce SPF load | Good — DUAL algorithm |
| Convergence | Fast (sub-second with tuning) | Very fast — feasible successor |
| Configuration | Moderate (areas, wildcard masks) | Simpler on all-Cisco networks |
| Multi-vendor support | Yes — runs on any platform | No — Cisco only |
| Best use case | Enterprise, SP, multi-vendor | Pure Cisco SMB / branch |
Use OSPF as your default IGP for any new deployment. Reserve EIGRP only for existing all-Cisco environments where migration cost is not justified.
Real-World OSPF Deployment Scenario
A logistics company in Karachi with four branch offices needed to replace a flat RIP network that was causing 45-second convergence delays when WAN links failed. We implemented OSPF single-area across all five sites using the Cisco router OSPF process ID 1, with loopback-based router IDs and passive interfaces on all LAN segments.
The key decisions made during the OSPF configuration on Cisco routers at each site:
- Reference bandwidth: Set to 10000 on all routers to correctly differentiate the 1G MPLS core from the 100M branch access links. Before this fix, OSPF was choosing longer paths because all links had the same cost of 1.
- DR election control: Set
ip ospf priority 100on the two hub routers at the Karachi data centre to ensure they always won DR/BDR election on the MPLS segment — preventing branch routers with less memory from becoming DR under any failure scenario. - MD5 authentication: Enabled on all inter-router links using a shared key. The MPLS provider’s support team confirmed this was best practice to prevent accidental or malicious route injection from provider equipment.
Results: Convergence time dropped from 45 seconds (RIP) to under 2 seconds. The network has been running without a single OSPF-related outage for 18 months. The total time to complete the OSPF configuration on all Cisco routers across five sites was under four hours, including testing and documentation.
Troubleshooting: OSPF Neighbour Not Forming
OSPF neighbour not forming is the most common issue after completing OSPF configuration on a Cisco router for the first time. It always has one of five root causes. Here is the exact diagnostic path for each.
Issue 1: Mismatched Hello / Dead Timers
Symptoms: Neighbours never reach 2-Way. No ADJCHG syslog messages appear after entering network statements.
Root cause: Hello and dead intervals must match exactly between neighbours. Broadcast defaults (10s hello / 40s dead) differ from NBMA defaults (30s / 120s).
! Check timers on both routers
R1# show ip ospf interface GigabitEthernet0/0
  Timer intervals configured: Hello 10, Dead 40

! Fix - explicitly match on both sides
R1(config-if)# ip ospf hello-interval 10
R1(config-if)# ip ospf dead-interval 40
Issue 2: Mismatched Area IDs
Symptoms: Routers exchange hellos but never advance past Init state.
Root cause: One interface is in Area 0, the other in Area 1. The area ID in the hello packet must match exactly.
! Confirm mismatch
R1# debug ip ospf hello
OSPF: Rcv hello from 2.2.2.2 area 1 on GigabitEthernet0/0
OSPF: Hello packet: area mismatch

! Fix
R2(config-router)# no network 10.0.12.0 0.0.0.3 area 1
R2(config-router)# network 10.0.12.0 0.0.0.3 area 0
Issue 3: MTU Mismatch (Stuck in ExStart)
Symptoms: Neighbour reaches ExStart but never advances. DBD packets loop repeatedly.
Root cause: Interface MTU mismatch causes DBD packets to be silently dropped.
! Check MTU
R1# show interfaces GigabitEthernet0/0 | include MTU

! Lab workaround only - fix actual MTU in production
R1(config-if)# ip ospf mtu-ignore
Issue 4: Duplicate Router IDs
Symptoms: Intermittent adjacency drops. Routes appear and disappear. This is the hardest OSPF problem to diagnose on a Cisco router because it is not always obvious which router has a duplicate.
! Identify the duplicate
R1# show ip ospf | include Router ID

! Fix - unique RID and clear process
R2(config-router)# router-id 2.2.2.2
R2# clear ip ospf process
Issue 5: ACL Blocking OSPF Multicast
Symptoms: No hellos on a specific interface despite correct OSPF configuration on the Cisco router.
Root cause: ACL blocking 224.0.0.5 (AllSPFRouters) or 224.0.0.6 (AllDRouters).
R1# show ip interface GigabitEthernet0/0 | include access list

R1(config)# ip access-list extended OSPF-PERMIT
R1(config-ext-nacl)# permit ospf any host 224.0.0.5
R1(config-ext-nacl)# permit ospf any host 224.0.0.6
OSPF Best Practices for Cisco Routers
Design
- Always set router IDs manually using loopback interfaces. Loopbacks never go down — they give you a stable RID and a reliable management address for SSH and SNMP.
- Keep Area 0 as the backbone. Every OSPF area must connect to Area 0. Non-backbone areas that connect directly to each other without passing through Area 0 create routing black holes.
- Fix the reference bandwidth first. Set
auto-cost reference-bandwidth 10000consistently on every router before advertising any routes. This is the single most impactful tuning step in a modern OSPF Cisco router deployment. - Use summarisation at Area Border Routers. Route summarisation at ABRs reduces SPF computation and limits the blast radius of topology changes to within a single area.
Security
- Enable MD5 authentication on all router-to-router links. Per Cisco’s OSPF security recommendations, MD5 authentication prevents rogue routers from forming adjacencies and injecting false routes.
R1(config-if)# ip ospf authentication message-digest
R1(config-if)# ip ospf message-digest-key 1 md5 SecureKey2026- Apply passive-interface to all non-router-facing interfaces. LAN switches and end hosts should never receive OSPF hellos.
Operations
- Document your OSPF area design. A topology diagram showing areas, ABRs, and redistribution points is the most valuable document you can maintain for a network running OSPF on Cisco routers.
- Monitor OSPF-5-ADJCHG syslog events. An unexpected adjacency drop is always the first sign of a hardware or link failure — configure alerts on this event in your SIEM or NMS.
FAQ: People Also Ask
How do I enable OSPF on a Cisco router?
Enable OSPF on a Cisco router with router ospf [process-id] in global configuration mode. Set a stable router ID with router-id [x.x.x.x], then advertise interfaces using network [address] [wildcard-mask] area [area-id]. Verify with show ip ospf neighbor. The process ID is locally significant — it does not need to match between routers. Full OSPF configuration Cisco router step by step takes under 15 minutes for a two-router single-area setup.
Why is OSPF neighbour not forming?
The five most common causes are mismatched hello/dead timers, mismatched area IDs, MTU mismatch causing DBD exchange failure, duplicate Router IDs, and an ACL blocking OSPF multicast 224.0.0.5 or 224.0.0.6. Start with show ip ospf neighbor to check the current state, then use debug ip ospf hello to identify the specific mismatch on the Cisco router OSPF process.
What is OSPF area 0?
Area 0 is the OSPF backbone area. All other OSPF areas must connect to Area 0 directly or via a virtual link. Inter-area routing must pass through Area 0 — this is a fundamental architectural requirement of OSPF defined in RFC 2328, not an optional guideline. Every OSPF configuration on a Cisco router must include at least one interface in Area 0.
OSPF vs EIGRP — which is better for Cisco networks?
OSPF is better for most modern Cisco deployments because it is an open standard supported on all routing platforms and scales cleanly through area design. EIGRP is simpler to configure on small all-Cisco networks and converges slightly faster in some topologies, but its Cisco-only nature makes OSPF the correct long-term choice for any network that includes or may include non-Cisco hardware.
Related Articles
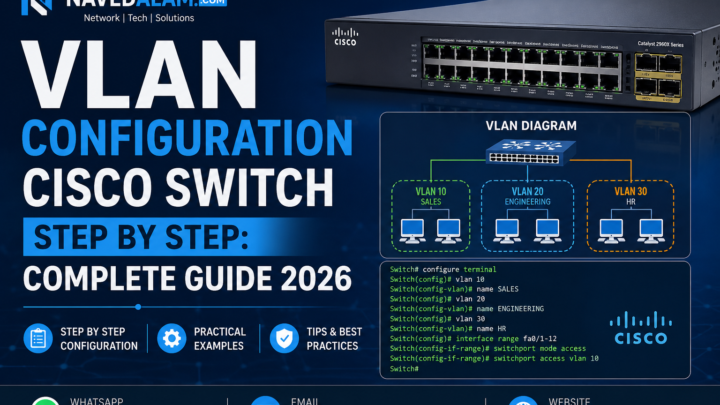
- VLAN Configuration on Cisco Switches: Complete Step-by-Step Guide 2026
- Cisco ASA Configuration Guide: Complete Firewall Setup 2026
- Remote Access VPN Configuration: Cisco IOS and ASA Guide 2026
- Network Troubleshooting Guide: Complete Fix 2026
Conclusion
OSPF configuration Cisco router step by step is straightforward once you understand five non-negotiable rules: always set the router ID manually from a loopback, use correct wildcard masks in network statements, ensure hello/dead timers match on both sides of every link, suppress hellos on LAN interfaces with passive-interface, and fix the reference bandwidth to reflect your actual link speeds. Follow these and your OSPF will converge reliably and stay stable in any enterprise environment.
- Set router IDs manually from loopbacks — automatic selection breaks when interfaces flap mid-deployment.
- Fix the reference bandwidth to 10000 — the default 100 Mbps value assigns equal cost to 100M and 10G links.
- Enable passive-interface on all LAN ports — suppresses hellos without removing the network from OSPF topology.
- Enable MD5 authentication on all router links — prevents rogue router injection in production.
- Monitor OSPF-5-ADJCHG events — the first sign of any hardware or link failure in an OSPF network.
The next step after mastering OSPF configuration on Cisco routers for single-area networks is multi-area design with ABR summarisation, followed by OSPF redistribution into BGP for enterprise edge deployments.
Need Expert Help with OSPF or Cisco Network Design?
I provide professional Cisco routing and switching design and deployment services for businesses across Pakistan and internationally. Whether you need a complete OSPF configuration across multiple Cisco routers, a routing design review, or emergency troubleshooting on a broken adjacency — I can help remotely or on-site.
- OSPF, BGP, and EIGRP configuration and optimisation on Cisco routers
- Cisco routing and switching design and deployment
- Network troubleshooting and performance tuning
- Azure and AWS cloud networking
- VPN design and implementation
Email: itexpert@navedalam.com
WhatsApp: +92 311 935 8005
Website: navedalam.com
Free 30-minute consultation — no obligation.
About the Author
Naveed Alam is a certified Network and Cloud Engineer specialising in enterprise routing, Cisco infrastructure, and Azure cloud networking. He holds CCNA, AZ-900, and CompTIA A+ certifications and has completed 50+ network infrastructure projects across Pakistan and internationally, including OSPF deployments on Cisco routers for logistics, finance, and manufacturing organisations.
Connect: LinkedIn · navedalam.com · itexpert@navedalam.com