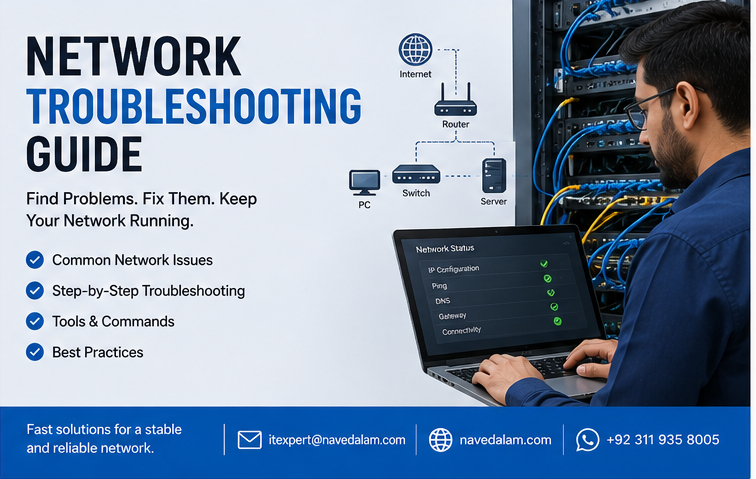
This network troubleshooting guide exists because most network problems are not mysterious — they follow predictable patterns and respond to a systematic diagnostic methodology every time.
After resolving network incidents across 50+ client environments — from a single office losing internet to a 300-user campus with intermittent VoIP quality issues — the engineers who fix things fastest are never the ones who guess.
They follow a structured process, use the right tools at each layer, and eliminate possibilities methodically. This network troubleshooting guide gives you that exact process.
It covers the OSI model layer-by-layer approach, every essential diagnostic command for Windows, the most common failure scenarios with their exact fixes, and the professional checklist engineers use on real production incidents.
Table of Contents
- Network Troubleshooting Methodology — Why Process Beats Guessing
- OSI Model Approach to Network Troubleshooting
- Best Network Troubleshooting Tools for Windows
- How to Use Ping and Traceroute for Network Troubleshooting
- How to Fix DNS Resolution Failure on a Network
- How to Troubleshoot Network Connectivity Issues Step by Step
- Slow Network Troubleshooting Guide
- Wireless Network Troubleshooting Common Issues
- Switch and Router Troubleshooting Commands
- Network Troubleshooting Checklist for Engineers
- Real-World Example: Full Incident Diagnosis
- Frequently Asked Questions
- Conclusion
Network Troubleshooting Methodology — Why Process Beats Guessing
The most expensive mistake in network troubleshooting is changing things without first understanding what is broken.
Rebooting devices, replacing cables, and restarting services without a diagnostic baseline wastes time, risks making things worse, and makes the real problem harder to find afterward.
A professional network troubleshooting guide always starts with information gathering before touching anything on the network.
Ask these five questions before opening a terminal:
- What exactly is broken — complete outage, partial outage, or degraded performance?
- Who is affected — one user, one floor, one office, or everyone on the network?
- When did it start — and what changed around that time such as a new device, config change, or ISP maintenance?
- Has it worked before, or is this a new setup that has never functioned correctly?
- Is the problem consistent or intermittent — does it happen on a pattern or at random?
The answers eliminate entire categories of failure immediately. A problem affecting exactly one user points to their device or switch port. A problem starting after a config change points directly to that change. An intermittent problem every four hours points to a timer-based process such as a DHCP lease expiry, scheduled task, or spanning tree reconvergence event.
Only after gathering this information should you open a terminal and begin running diagnostics using this network troubleshooting guide methodology.
OSI Model Approach to Network Troubleshooting
The OSI model layer-by-layer approach is the most reliable framework in any network troubleshooting guide because network problems always manifest at one specific layer — and fixing the wrong layer wastes time without resolving anything.
Work from the bottom up. Each layer depends on the layer below it functioning correctly. Confirming Layer 1 before diagnosing Layer 3 prevents spending 30 minutes on routing tables when the actual problem is a disconnected cable.
This is the core layer by layer network troubleshooting osi model framework every engineer should internalise:
| OSI Layer | What to Check | Key Tools | Common Failures |
|---|---|---|---|
| Layer 1 — Physical | Cables, ports, link lights, SFPs | Cable tester, switch port LEDs | Bad cable, faulty SFP, wrong port |
| Layer 2 — Data Link | MAC table, VLAN assignment, spanning tree state | arp -a, show mac address-table | Wrong VLAN, STP loop, duplicate MAC |
| Layer 3 — Network | IP address, subnet mask, default gateway, routing table | ipconfig, ping, route print, tracert | Wrong IP, missing gateway, routing black hole |
| Layer 4 — Transport | Ports open, firewall rules, TCP/UDP session state | netstat, telnet, Test-NetConnection | Blocked port, firewall rule, NAT failure |
| Layer 7 — Application | DNS resolution, HTTP response codes, application errors | nslookup, curl, browser dev tools | DNS failure, certificate error, app misconfiguration |
In most networks, 80% of problems live at Layers 1 through 3. Layer 4 and Layer 7 failures are typically firewall rules blocking specific application ports or DNS resolution failures — both quickly diagnosed with the right tools in this network troubleshooting guide.
Best Network Troubleshooting Tools for Windows
Every engineer following this network troubleshooting guide should have these network troubleshooting tools for windows immediately available on every machine used for diagnostics.
Built-in Windows tools available on every machine with no installation:
- ipconfig /all — Shows every network adapter’s IP address, subnet mask, default gateway, DNS servers, MAC address, and DHCP lease details. This is the first command to run on any connectivity problem — before anything else.
- ping — Tests ICMP reachability to any IP address or hostname. Confirms Layer 3 connectivity and basic DNS resolution when used with a hostname rather than an IP.
- tracert on Windows and traceroute on Linux and Mac — Shows every routing hop between your device and the destination with round-trip latency at each hop. Identifies exactly where packets are being dropped or delayed in the path.
- nslookup — Queries DNS servers directly. Tests whether a hostname resolves correctly and identifies which DNS server is providing the answer — critical for the how to troubleshoot dns resolution failure process.
- netstat -ano — Shows all active TCP and UDP connections and listening ports with the process ID responsible for each connection. Essential for diagnosing blocked ports and confirming services are actually listening.
- arp -a — Displays the ARP cache mapping IP addresses to MAC addresses. Used to confirm Layer 2 adjacency and diagnose ARP-related connectivity failures.
- route print — Shows the full Windows routing table. Confirms the default gateway is correct and identifies any conflicting static routes causing routing loops.
- Test-NetConnection in PowerShell — Tests TCP connectivity to a specific port on a remote host. Significantly more informative than ping for diagnosing application-layer connectivity failures.
Free tools worth installing for deeper analysis:
- Wireshark — Packet capture and protocol analysis. The definitive tool for diagnosing problems that cannot be identified from command-line output alone — including TCP retransmissions, malformed packets, and application-level protocol errors.
- PingPlotter — Continuous path analysis showing latency and packet loss at every hop over time. Essential for diagnosing intermittent WAN quality and jitter affecting VoIP.
- Advanced IP Scanner — Scans a subnet and lists all active hosts with MAC addresses and open ports. Useful for finding rogue devices and confirming DHCP allocations across a segment.
How to Use Ping and Traceroute for Network Troubleshooting
The ping traceroute nslookup troubleshooting commands are the three most important diagnostic tools in this network troubleshooting guide. Understanding what their output actually tells you — and what it does not — separates systematic diagnosis from guesswork.
Using ping effectively in sequence:
Ping sends ICMP Echo Request packets and waits for Echo Reply responses. A successful ping with consistent low latency — under 1ms on a LAN, under 50ms on a typical broadband WAN — confirms Layer 3 reachability between two devices.
Run ping in this exact diagnostic sequence to isolate the failure point:
- Ping 127.0.0.1 loopback — confirms the TCP/IP stack on your local device is functional
- Ping your own IP address — confirms your NIC is operational and bound correctly
- Ping your default gateway — confirms local network connectivity at Layer 2 and Layer 3
- Ping a known external IP such as 8.8.8.8 — confirms internet routing is working without involving DNS
- Ping a hostname such as google.com — confirms DNS resolution is working end-to-end
If ping to 8.8.8.8 succeeds but ping to google.com fails, the problem is DNS resolution — not internet connectivity. This single distinction saves enormous diagnostic time in this network troubleshooting guide approach.
Important caveat: many enterprise firewalls and Windows Defender Firewall block ICMP Echo requests by default. A failed ping does not always mean the host is unreachable — it may mean ICMP is blocked at a firewall. Use Test-NetConnection to a specific TCP port to confirm reachability when ping produces inconclusive results.
Reading traceroute output correctly:
- Consistent latency jump at one specific hop: The bottleneck is at or immediately after that hop — congestion or a slow WAN link.
- Asterisks at one hop then normal responses at the next: That router blocks ICMP but forwards traffic normally — not a real problem, continue reading subsequent hops.
- Asterisks from a specific hop onwards: Packets are not returning from that point — routing failure, firewall block, or the destination is unreachable beyond that hop.
- Gradually increasing latency that stays elevated through all subsequent hops: The high-latency hop is a genuine bottleneck — typically an overloaded router interface or a slow WAN segment.
How to Fix DNS Resolution Failure on a Network
DNS failure is one of the most disruptive and most misdiagnosed issues in any network troubleshooting guide — it appears identical to a complete internet outage when the internet connection is actually working perfectly.
Recognising DNS failure symptoms: Websites fail to load by name but load correctly when you enter the IP address directly in the browser. Ping to 8.8.8.8 succeeds but ping to google.com fails with a resolution error. Applications report they cannot connect to their servers. VPN connects successfully but internal resources are unreachable by hostname.
Step 1 — Identify the DNS server the client is using. Run ipconfig /all and check the DNS Servers line. Confirm this is the expected DNS server for your environment — your ISP’s DNS resolver, your internal domain controller if on a Windows domain, or a public resolver such as 8.8.8.8 or 1.1.1.1.
Step 2 — Test DNS resolution directly using nslookup. Run nslookup google.com and read the result. If it returns a server failure or timeout, note the server address shown at the top — if it shows an unexpected server, DNS configuration is the problem. If it resolves but returns the wrong IP, the DNS server has a corrupted or stale cache entry.
Step 3 — Flush the local DNS cache and retest. Run ipconfig /flushdns to clear all cached records, then attempt resolution again. A significant proportion of DNS failures resolve after a cache flush — the client was serving a stale expired record from a previous session.
Step 4 — Test DNS with an alternative resolver. Manually configure DNS to 8.8.8.8 on the affected client and retest. If resolution succeeds with 8.8.8.8 but fails with your normal DNS server, the DNS server itself is the failure point — not the client configuration or the network path.
Step 5 — Investigate the DNS server directly. On the DNS server or your router if using the ISP resolver, verify the DNS service is running, forwarders are configured to reachable upstream servers, and the server can resolve external names itself. For Active Directory environments, verify the DNS forward lookup zone for the domain exists and the SOA record is healthy.
For VPN-specific DNS failures where the VPN tunnel connects but internal names do not resolve, see our No Internet After VPN Connect fix guide which covers split-tunnel DNS configuration and FortiGate SSL VPN DNS push settings in detail.
How to Troubleshoot Network Connectivity Issues Step by Step
This network troubleshooting step by step methodology is the core of this network troubleshooting guide. Follow it in sequence for any connectivity problem, whether it affects a single user or an entire site.
Step 1 — Define the exact scope of the problem. Is the problem affecting one device, one subnet, one building, or all sites simultaneously? Scope immediately narrows the failure domain. A single affected device points to that device or its switch port. All devices on one floor pointing to the distribution switch or floor uplink. All devices site-wide pointing to the WAN router or ISP circuit.
Step 2 — Verify Layer 1 physical connectivity. On the affected device, check the NIC link light status. On the switch, check the port LED. A dark or orange link light means no physical layer connectivity — check the cable, substitute a known-good cable, and try a different switch port. Confirm the NIC is enabled in Device Manager and has not been disabled by a power management policy or Group Policy Object.
Step 3 — Verify the IP configuration completely. Run ipconfig /all on the affected device. Confirm the IP address is within the correct subnet, the subnet mask matches the network design, the default gateway is present and falls within the same subnet as the client, and DNS server addresses are correct. A 169.254.x.x address — known as an APIPA address — means DHCP failed and the device could not obtain a lease from any DHCP server on the segment.
Step 4 — Test local network connectivity by pinging the gateway. If the gateway ping fails, the problem is local between the device and the gateway at Layer 1 or Layer 2. If it succeeds, the local network segment is healthy and the problem lies beyond the gateway.
Step 5 — Test internet routing by pinging 8.8.8.8. If this fails but the gateway ping succeeded, the problem is at the router or ISP level. Check the router’s WAN interface status, confirm the ISP circuit is active, and review any recent changes to WAN configuration or routing policies.
Step 6 — Test DNS by pinging a hostname. Ping google.com. If 8.8.8.8 worked but the hostname ping fails, DNS is the only remaining variable. Follow the how to troubleshoot dns resolution failure steps covered in the previous section.
Step 7 — Test specific application ports if base connectivity works. If basic connectivity passes all tests but a specific application still fails, the problem is at Layer 4 or Layer 7. Use Test-NetConnection with the target server name and specific port number to confirm whether that port is reachable. A connection timeout indicates a firewall is blocking that specific port somewhere in the path.
Slow Network Troubleshooting Guide
Slow network performance is harder to diagnose than complete outages because symptoms are vague and causes are numerous. This section of the network troubleshooting guide gives you the structured slow network troubleshooting guide approach used in production environments.
Establish a performance baseline before changing anything. Run a speed test from the affected device and from an unaffected device on the same network simultaneously. If both show similar degraded speeds, the bottleneck is upstream — the WAN link, ISP circuit, or border router. If only one device is slow, the bottleneck is local to that device or its specific switch port.
Common causes of slow network performance and how to identify each:
- Half-duplex mismatch: One side of a network link is set to full duplex while the other auto-negotiated to half duplex. This causes severe collision rates and throughput degradation that resembles general network slowness. Check switch port interface statistics for CRC errors and collision counts. Fix by explicitly configuring both sides to the same speed and full-duplex setting rather than leaving either side on auto-negotiation.
- Bandwidth saturation: The WAN link or a specific switch uplink is running at near-100% utilisation, causing queuing delays for all traffic. Identify using interface counters on the router or switch, or via SNMP polling. Fix by upgrading the link capacity, implementing QoS prioritisation, or identifying and controlling the bandwidth-consuming application or user.
- Wireless channel congestion: Multiple access points operating on overlapping channels create co-channel interference that reduces effective throughput. Scan the wireless spectrum using a tool such as Wi-Fi Analyser, identify which channels neighbouring networks are using, and configure your access points to non-overlapping channels — channels 1, 6, and 11 for 2.4 GHz, or any available 20 MHz channel on the less congested 5 GHz band.
- Faulty cable or degraded SFP: A marginal physical connection causes high frame error rates and retransmissions that manifest as general network slowness. Check interface error counters on the connected switch port — elevated CRC error counts, input errors, or output drops all point to a physical layer problem requiring cable or SFP replacement.
- DNS latency: A slow or overloaded DNS server adds latency to every new connection establishment. Test DNS query response time using nslookup — the query time displayed in the output reflects the DNS server’s response latency. Switch to 8.8.8.8 or 1.1.1.1 temporarily to test whether DNS is contributing to the perceived slowness.
Wireless Network Troubleshooting Common Issues
Wireless troubleshooting adds a layer of complexity to the standard network troubleshooting guide because the physical medium — radio frequency — is shared, invisible, and subject to interference from sources entirely outside your control.
Cannot connect to Wi-Fi — authentication failure. Verify the SSID name and passphrase are correct. Confirm the SSID is broadcasting and not hidden, as hidden SSIDs frequently cause client confusion. For enterprise WPA2-Enterprise environments, verify the RADIUS authentication server is reachable from the access point and that the user credentials exist and are active. Check the Windows wireless event log for specific EAP authentication error codes which identify exactly which stage of authentication is failing.
Connected to Wi-Fi but no internet access. This is a Layer 3 problem, not a wireless association problem. The wireless connection is working correctly — confirm DHCP address assignment using ipconfig /all, then follow the standard Layer 3 connectivity troubleshooting sequence described above. The wireless medium is not the failure point in this scenario.
Intermittent wireless disconnections. The most common causes are interference from neighbouring networks operating on the same channel, aggressive client roaming between access points, or DHCP lease renewal failures. Check the Windows wireless event log for Event ID 8001 and 8003 which contain the specific disconnect reason codes. Enable band steering on your access points to push capable 802.11ac and Wi-Fi 6 clients to the less congested 5 GHz band.
Slow wireless speeds despite strong signal strength. Signal strength — measured as RSSI — is not the same as achievable throughput. A strong signal on a congested channel delivers poor actual throughput. Use a wireless spectrum analyser to identify co-channel interference sources. Verify the negotiated connection rate in the wireless adapter properties — a Wi-Fi 6 capable device connecting at 54 Mbps indicates it has fallen back to a legacy connection rate due to a poor signal condition or an outdated wireless driver.
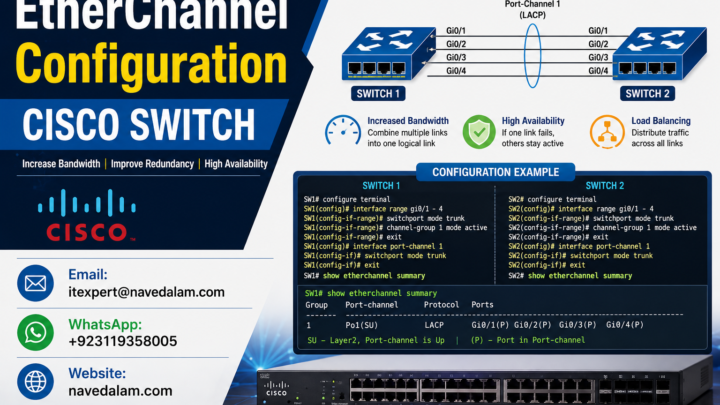
Switch and Router Troubleshooting Commands
Infrastructure-level diagnosis is a critical extension of any network troubleshooting guide for network engineers who have CLI access to managed switches and routers. The switch and router troubleshooting commands below are the essential diagnostic set.
Essential Cisco switch diagnostic commands:
- show interfaces — displays full interface status including speed, duplex negotiation, and error counters for every port on the switch
- show interfaces status — summary table showing connected or not-connected status, speed, and duplex for all ports simultaneously
- show mac address-table — shows which MAC addresses have been learned on which switch ports and in which VLANs
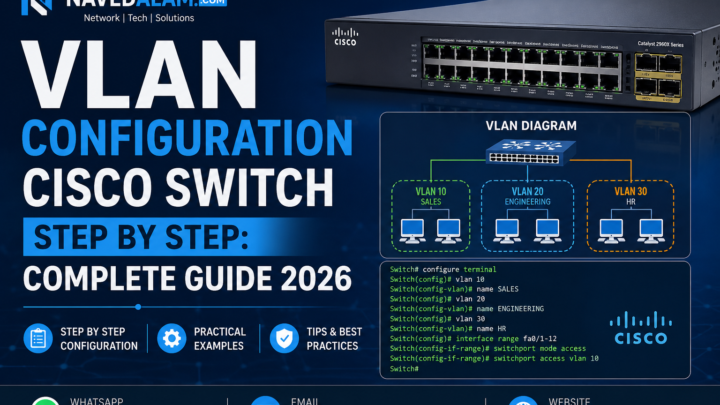
- show vlan brief — confirms which VLANs exist on the switch and which ports are assigned to each VLAN
- show spanning-tree — displays spanning tree state per VLAN including the root bridge identity and any ports currently in blocking or listening state
- show ip arp — displays the ARP table mapping IP addresses to MAC addresses to outgoing interfaces
Essential Cisco router diagnostic commands:
- show ip interface brief — summary view of all router interfaces with their IP addresses and current up/down status
- show ip route — displays the complete routing table showing how the router forwards traffic to every known destination prefix
- show ip bgp summary — for environments using BGP, shows all neighbour adjacency states and the number of prefixes received from each neighbour
- show crypto ipsec sa — for VPN environments, shows IPsec security association status and packet encryption and decryption counters per tunnel
For VPN-specific troubleshooting covering IPsec tunnel state failures and IKE negotiation errors, see our Azure VPN Gateway configuration guide and our Cisco remote access VPN guide.
For Windows Server issues that present as network connectivity failures — particularly Remote Desktop Protocol failures — see our RDP Not Working on Windows Server fix guide.
Network Troubleshooting Checklist for Engineers
Use this network troubleshooting checklist for engineers at the start of every network incident. It is the structured framework that makes this network troubleshooting guide repeatable across different environments, different engineers, and different incident types.
Information gathering — complete before running any commands:
- Define the exact symptom — complete outage, partial loss, or degraded performance
- Identify the scope — single user, single subnet, single site, or all locations
- Confirm when it started and what changed in the environment around that time
- Determine whether the problem is consistent or follows an intermittent pattern
Layer 1 Physical verification:
- Confirm link lights are green on both the NIC and the connected switch port
- Substitute a known-good cable and test again
- Try a different physical switch port on the same switch
- Confirm the NIC is enabled in Device Manager and not suppressed by a power management policy
Layer 2 Data Link verification:
- Verify the VLAN assignment on the switch port matches the intended network segment
- Check for spanning tree port states — all access ports should be in forwarding state
- Confirm no duplicate IP addresses exist on the segment using arp -a
Layer 3 Network verification:
- Run ipconfig /all and verify IP address, subnet mask, and default gateway are all correct
- Ping the default gateway and confirm a response
- Ping 8.8.8.8 to test internet routing independent of DNS
- Run route print to confirm the correct default route exists in the routing table
Layer 7 Application and DNS verification:
- Ping a hostname — if it fails while IP ping succeeds, the problem is exclusively DNS
- Run nslookup and identify which DNS server responded and what it returned
- Run ipconfig /flushdns to clear stale cached records and retest
- Use Test-NetConnection with the target port number to confirm specific application port reachability
Real-World Example: Full Network Incident Diagnosis
A 60-user logistics company in Islamabad reported that their entire office had lost internet access at 9:15 AM on a Monday morning. Microsoft Teams calls were failing, the cloud-hosted ERP system was unreachable, and the office CCTV monitoring system had gone offline simultaneously.
Applying this network troubleshooting guide methodology from the first minute:
Information gathering: All 60 users were affected simultaneously. The problem started at exactly 9:15 AM — a precise timestamp suggesting a scheduled event or automated process rather than random hardware failure. The ISP had sent an email the previous Friday about a maintenance window scheduled from 9 to 11 AM Monday morning.
Layer 1 check: All switch port LEDs were solid green throughout the office. Physical layer was confirmed healthy across the entire LAN.
Layer 3 check: Ping to the default gateway — the LAN interface of the FortiGate firewall — succeeded with normal latency. The local network was fully healthy. Ping to 8.8.8.8 failed with no response. The failure was confirmed at or beyond the WAN interface.
WAN interface investigation: The FortiGate WAN interface showed no assigned IP address. The DHCP lease from the ISP had not renewed following the maintenance window. The ISP had changed their DHCP server IP address range during maintenance, and the FortiGate’s DHCP client was still referencing the old server address from its cached lease.
Resolution: Released and renewed the WAN DHCP lease from the FortiGate management console. Internet access was restored within 90 seconds. Total diagnosis time from first call to resolution: 11 minutes. Without the structured network troubleshooting guide methodology, this incident could have consumed hours of unguided troubleshooting.
Frequently Asked Questions
How do I troubleshoot network connectivity problems step by step?
Follow this network troubleshooting guide sequence: gather information about scope and timing of the problem first, check Layer 1 physical connectivity by examining link lights and cables, verify the IP configuration using ipconfig, ping the default gateway, ping an external IP address such as 8.8.8.8, ping a hostname to test DNS resolution, then test specific application ports if all base connectivity tests pass. Work from the bottom of the OSI model upward — 80% of problems resolve at Layers 1 through 3.
What are the best tools for network troubleshooting?
The best built-in network troubleshooting tools for windows are ping, tracert, nslookup, ipconfig, netstat, and arp — available on every Windows machine with no installation required. For deeper analysis, Wireshark provides packet-level capture and protocol analysis. PingPlotter shows continuous path latency over time for intermittent WAN quality issues. Advanced IP Scanner discovers all active devices on a subnet. Test-NetConnection in PowerShell tests specific TCP ports more reliably than ping for application-layer connectivity diagnosis.
How do I use ping and traceroute for network troubleshooting?
Ping tests ICMP reachability — run it in the diagnostic sequence: loopback 127.0.0.1, then your own IP, then the default gateway, then an external IP such as 8.8.8.8, then a hostname such as google.com. If the IP address ping works but the hostname ping fails, the problem is DNS resolution exclusively — not network connectivity. Traceroute shows every routing hop between you and the destination — look for consistent latency jumps at a specific hop or asterisks from a specific hop onwards indicating the path breaks at that point.
What is the OSI model approach to network troubleshooting?
The layer by layer network troubleshooting osi model approach starts at Layer 1 physical — cables and link lights — and works upward: Layer 2 data link covering VLANs, spanning tree, and MAC address tables; Layer 3 network covering IP addressing, routing, and the default gateway; Layer 4 transport covering port availability and firewall rules; and Layer 7 application covering DNS resolution, HTTP responses, and application-specific errors. Confirming each lower layer before diagnosing higher layers prevents wasted time troubleshooting the wrong component.
How do I fix DNS resolution failure on a network?
To fix a how to troubleshoot dns resolution failure problem: run ipconfig /flushdns to clear stale cached records, then run nslookup google.com to identify which DNS server is responding. If resolution fails with your configured server, test the same query against 8.8.8.8 directly — if that succeeds, your configured DNS server is the failure point. Verify the DNS server service is running, its forwarders point to reachable upstream resolvers, and for Active Directory domains, verify the domain’s DNS forward lookup zone is intact with a valid SOA record.
Conclusion: Your Network Troubleshooting Guide Summary
The most important lesson from this network troubleshooting guide is that systematic process consistently outperforms experience alone. An engineer who follows the OSI model bottom-up on every incident solves problems faster and more reliably than one who relies on intuition and makes changes without diagnostic evidence.
Key principles from this network troubleshooting guide to apply on every incident:
- Gather information before touching anything: Scope, timing, and recent changes eliminate entire failure categories before you run a single diagnostic command.
- Work bottom-up through the OSI model: Confirm Layer 1 physical connectivity before diagnosing Layer 3 routing. Most problems live at Layers 1 through 3.
- Ping 8.8.8.8 before pinging a hostname: This single step instantly separates a genuine connectivity problem from a DNS resolution failure.
- DNS failure looks identical to an internet outage: Always flush the DNS cache and test with an alternate resolver before concluding the internet connection is down.
- Check switch interface error counters for slow network complaints: High CRC error counts or collision counts on a switch port indicate a physical Layer 1 problem — not a routing or application problem.
Related reading on navedalam.com:
- No Internet After VPN Connect — Fix Guide
- RDP Not Working on Windows Server — Fix Guide
- Active Directory Replication Failed — Fix Guide
- Azure VPN Gateway Configuration Guide
- Remote IT Support Services
External references:
- Microsoft — Windows Server Networking Documentation
- Cisco — Network Troubleshooting Reference Guide
- NIST — Enterprise Network Management Best Practices
Need Expert Network Troubleshooting Support?
When this network troubleshooting guide runs out of answers, I provide professional remote network diagnosis and resolution for businesses across Pakistan and internationally.
Whether it is a complete site outage, intermittent connectivity degrading VoIP quality, a VPN refusing to establish, or a DNS failure masquerading as a server problem — I can diagnose and resolve it remotely, usually within the first session.
Network Support Services
- Emergency network outage diagnosis and resolution
- Intermittent connectivity and WAN performance investigation
- Cisco switch and router configuration and troubleshooting
- FortiGate and Cisco ASA firewall diagnosis and remediation
- VPN troubleshooting — IPsec, SSL VPN, and Azure VPN Gateway
- DNS, DHCP, and Active Directory network issues
- Wireless network design, diagnosis, and performance optimisation
Email: itexpert@navedalam.com
WhatsApp: +92 311 935 8005
Website: navedalam.com
Free 30-minute consultation — no obligation, no commitment.
About the Author
Naveed Alam is a certified Network and Cloud Engineer with hands-on experience diagnosing and resolving network incidents across 50+ client environments in Pakistan and internationally.
Holding the Cisco CCNA certification and Fortinet NSE 4, Naveed specialises in network infrastructure design, systematic troubleshooting, VPN deployments, and cloud networking — with a particular focus on the kind of structured diagnostic methodology described throughout this network troubleshooting guide.
Certifications: Cisco CCNA · Microsoft Azure Fundamentals AZ-900 · CompTIA A+ · Fortinet NSE 4
LinkedIn · navedalam.com · itexpert@navedalam.com