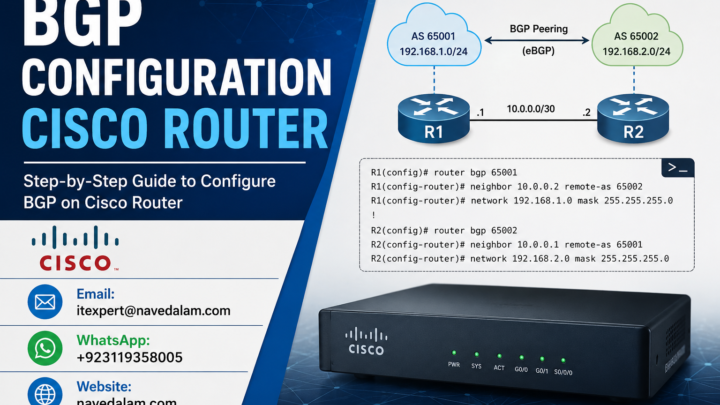
channel-group [N] mode active for LACP or mode desirable for PAgP on both switches, then configure the resulting Port-Channel interface as any physical interface. Verify with show etherchannel summary.EtherChannel configuration Cisco switch is one of the most searched — and most misunderstood — topics in enterprise switching. The promise is straightforward: bundle two, four, or eight physical links into a single logical Port-Channel interface, multiply available bandwidth, and eliminate the redundancy penalty that Spanning Tree Protocol imposes on parallel links. The execution trips up even experienced engineers because EtherChannel configuration on a Cisco switch is silently unforgiving — one mismatched parameter across member ports and the bundle refuses to form with no error message.
This guide covers EtherChannel configuration Cisco switch deployments from first principles to advanced production design. You will learn how LACP (IEEE 802.3ad) and PAgP (Cisco proprietary) negotiation protocols differ in practice, how to configure Layer 2 and Layer 3 EtherChannel on Cisco Catalyst IOS switches, how to tune load balancing algorithms for your traffic profile, and how to diagnose and fix the five most common reasons a Cisco switch EtherChannel refuses to come up. Whether you are preparing for CCNA or CCNP, or deploying a production switch stack, this is the reference you work from directly.
Why EtherChannel Matters in Modern Switch Design
Without EtherChannel configuration on a Cisco switch, connecting two switches with multiple cables creates a Spanning Tree problem: STP blocks all but one path to prevent loops, discarding the bandwidth and redundancy you paid for. A pair of switches connected by four 1 Gbps links delivers only 1 Gbps of usable throughput when STP blocks three of them. With a correct Cisco switch EtherChannel configuration, all four links carry traffic simultaneously, delivering up to 4 Gbps of aggregate bandwidth and surviving any single link failure without a topology change.
In production environments, EtherChannel configuration Cisco switch deployments are used at three main points: between access and distribution switches for high-density uplinks, between distribution and core switches for backbone bandwidth, and between switches and servers or firewalls requiring more than one physical link’s capacity. A Cisco ASA firewall connected to a switch stack with a dual-link EtherChannel provides both uplink redundancy and throughput headroom without the complexity of separate failover configurations.
For CCNA candidates, EtherChannel configuration Cisco switch topics are guaranteed exam material. For CCNP, the expectation extends to Layer 3 port-channels, load balancing algorithm selection, and cross-stack EtherChannel configurations. This guide satisfies both audiences.
EtherChannel Architecture Explained
EtherChannel configuration on a Cisco switch groups individual physical interfaces — called member ports — into a single logical interface called a Port-Channel. The IOS operating system presents the Port-Channel to the rest of the system as one interface. Spanning Tree sees one link. Routing protocols see one interface. VLANs are configured once on the Port-Channel, not per member port.
Internally, the Cisco switch distributes frames across member links using a load balancing algorithm applied per-flow, not per-frame. EtherChannel does not round-robin individual frames. It hashes source/destination MAC addresses, IP addresses, or TCP/UDP ports to assign each traffic flow to a specific member link. A single large file transfer stays on one link; the aggregate throughput across many concurrent flows approaches the total of all member links.
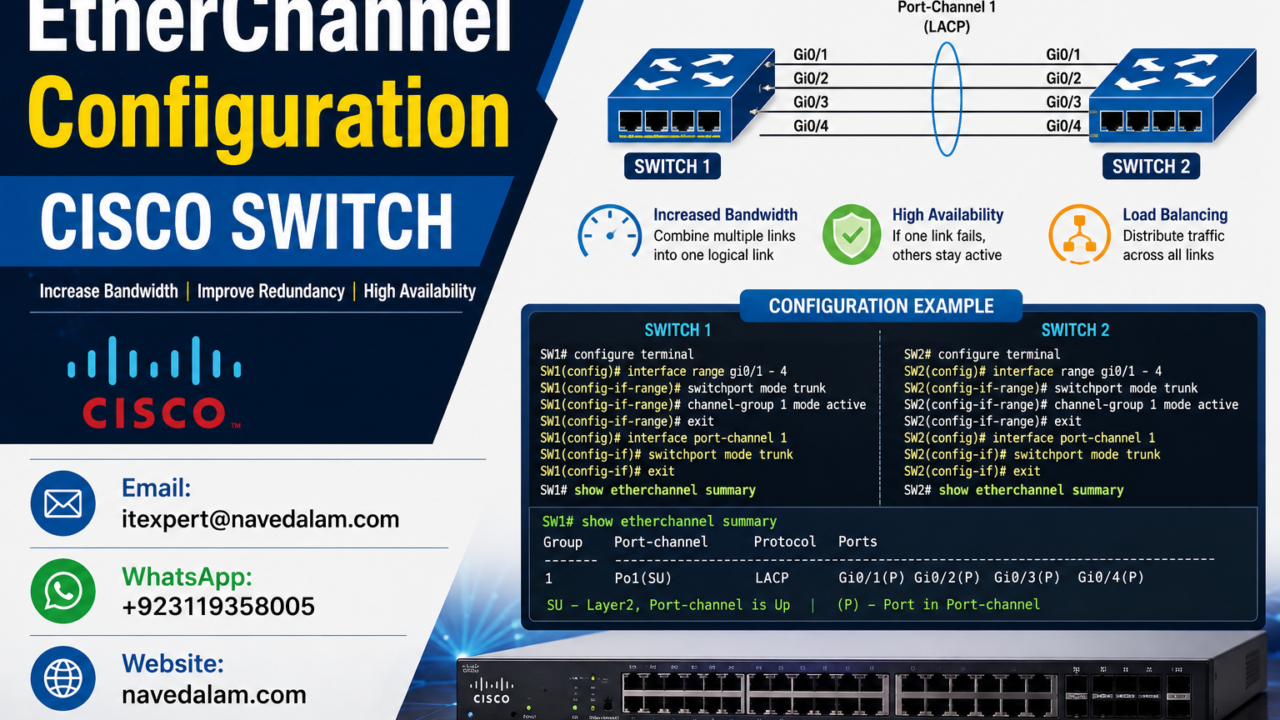
EtherChannel Configuration Cisco Switch — Topology:

  Distribution SW-A                    Distribution SW-B
  +------------------+                +------------------+
  |  Port-Channel 1  |<--- Gi0/1 --->|  Port-Channel 1  |
  |  (logical 4Gbps) |<--- Gi0/2 --->|  (logical 4Gbps) |
  |                  |<--- Gi0/3 --->|                  |
  |                  |<--- Gi0/4 --->|                  |
  +------------------+                +------------------+
        |                                     |
   Access SW-1                           Access SW-2
   (VLANs 10,20,30)                     (VLANs 10,20,30)
EtherChannel configuration on a Cisco switch supports two negotiation protocols and one static mode. LACP (IEEE 802.3ad) is the open standard supported by all modern vendors. PAgP is Cisco proprietary and works only between Cisco devices. Static mode (ON) requires no negotiation — useful in labs but risky in production because it provides no keepalive to detect peer-side failures.
LACP vs PAgP vs Static — Mode Comparison Table
Choosing the right negotiation mode is the first decision in any EtherChannel configuration Cisco switch deployment. The table below covers all three options with their commands, compatibility, and recommended use cases.
| Feature | LACP (802.3ad) | PAgP | Static (ON) |
|---|---|---|---|
| Standard | IEEE 802.3ad — open | Cisco proprietary | No standard |
| Multi-vendor support | Yes | Cisco only | N/A |
| Active mode command | channel-group N mode active | channel-group N mode desirable | channel-group N mode on |
| Passive mode command | channel-group N mode passive | channel-group N mode auto | on (both sides) |
| Max member ports | 8 active + 8 standby | 8 | 8 |
| Recommended for production | Yes — preferred | Cisco-only networks | Labs only |
| Detects remote failure | Yes — via LACPDUs | Yes — via PAgP PDUs | No |
Use LACP in all new EtherChannel configuration Cisco switch deployments. It is the IEEE standard, supported across Cisco, Juniper, HP, and cloud fabric vendors. Never use static ON mode in production — it forms the bundle without verifying the peer is configured, which means misconfigured cables can silently aggregate traffic in the wrong direction.
Prerequisites and Lab Setup
Before beginning EtherChannel configuration on a Cisco switch, verify your environment meets these requirements.
Supported Hardware:
- Cisco Catalyst 2960, 3560, 3750, 3850, 9200, or 9300 series (IOS 15.x or IOS-XE)
- Minimum 2 matching physical interfaces per switch (same speed, same media type)
- Interfaces not already assigned to another EtherChannel group
Lab network assumptions for this EtherChannel configuration guide:
- Switch-A: SW-A, interfaces GigabitEthernet0/1 – 0/4
- Switch-B: SW-B, interfaces GigabitEthernet0/1 – 0/4
- Port-Channel group number: 1 | VLAN trunk: VLANs 10, 20, 30 | Native VLAN: 99
Critical pre-check — run before any EtherChannel configuration Cisco switch work:
SW-A# show interfaces GigabitEthernet0/1 status
Port      Name    Status     Vlan   Duplex  Speed  Type
Gi0/1             connected  trunk  a-full  a-1000 10/100/1000BaseTX

! All member ports must show identical speed and duplex
! Any mismatch prevents EtherChannel bundle formation on the Cisco switch
Step-by-Step EtherChannel Configuration Cisco Switch Guide
Follow these five phases in order for a clean, reliable EtherChannel configuration on your Cisco switch. Skipping any phase is the leading cause of deployment failures.
Phase 1: Remove Existing Configuration from Member Ports
Before EtherChannel configuration on a Cisco switch, clear any existing individual interface configuration. Ports joining a bundle inherit all configuration from the Port-Channel interface — per-port VLAN or trunk settings cause parameter mismatch errors and prevent bundle formation.
! SW-A — clean member interfaces before EtherChannel configuration
SW-A(config)# interface range GigabitEthernet0/1 - 4
SW-A(config-if-range)# no switchport access vlan
SW-A(config-if-range)# no switchport trunk allowed vlan
SW-A(config-if-range)# no ip address
SW-A(config-if-range)# shutdown

! Repeat identical cleanup on SW-B
SW-B(config)# interface range GigabitEthernet0/1 - 4
SW-B(config-if-range)# no switchport access vlan
SW-B(config-if-range)# no switchport trunk allowed vlan
SW-B(config-if-range)# shutdownPhase 2: Assign Ports to EtherChannel Group — LACP Mode
The channel-group command is the core of EtherChannel configuration on a Cisco switch. It assigns physical interfaces to a logical bundle and sets the negotiation protocol. The group number must match on both switches for the same bundle.
! SW-A — LACP EtherChannel configuration on Cisco switch (active mode)
SW-A(config)# interface range GigabitEthernet0/1 - 4
SW-A(config-if-range)# channel-group 1 mode active
SW-A(config-if-range)# no shutdown

! Expected IOS output:
! Creating a port-channel interface Port-channel 1
! %LINEPROTO-5-UPDOWN: Line protocol on Interface GigabitEthernet0/1, changed state to up

! SW-B — passive mode works with an active peer
SW-B(config)# interface range GigabitEthernet0/1 - 4
SW-B(config-if-range)# channel-group 1 mode passive
SW-B(config-if-range)# no shutdown
Verification after Phase 2:
SW-A# show etherchannel summary
Flags:  D - down   P - bundled in port-channel
        I - stand-alone   s - suspended
        R - Layer3   S - Layer2   U - in use

Group  Port-channel  Protocol    Ports
1      Po1(SU)         LACP      Gi0/1(P)  Gi0/2(P)  Gi0/3(P)  Gi0/4(P)

! SU = Layer2 (S) and in Use (U) = EtherChannel configuration Cisco switch successful
! P on each port = bundled and passing traffic
! I (stand-alone) or s (suspended) = parameter mismatch
Phase 3: Configure the Port-Channel Interface as a Trunk
The critical rule in EtherChannel configuration on a Cisco switch: all VLAN and trunk settings go on the Port-Channel interface only, never on individual member ports. Member ports inherit configuration from the Port-Channel.
! SW-A — configure Port-Channel as trunk
SW-A(config)# interface Port-channel 1
SW-A(config-if)# switchport trunk encapsulation dot1q
SW-A(config-if)# switchport mode trunk
SW-A(config-if)# switchport trunk native vlan 99
SW-A(config-if)# switchport trunk allowed vlan 10,20,30
SW-A(config-if)# no shutdown

! SW-B — identical configuration (must match exactly)
SW-B(config)# interface Port-channel 1
SW-B(config-if)# switchport trunk encapsulation dot1q
SW-B(config-if)# switchport mode trunk
SW-B(config-if)# switchport trunk native vlan 99
SW-B(config-if)# switchport trunk allowed vlan 10,20,30
SW-B(config-if)# no shutdown
Phase 4: Configure PAgP Mode (Cisco-Only Networks)
! PAgP EtherChannel configuration on Cisco switch — desirable on at least one side
SW-A(config)# interface range GigabitEthernet0/1 - 4
SW-A(config-if-range)# channel-group 1 mode desirable

SW-B(config)# interface range GigabitEthernet0/1 - 4
SW-B(config-if-range)# channel-group 1 mode auto
Phase 5: Static EtherChannel — ON Mode (Lab Only)
! Static EtherChannel configuration on Cisco switch — both sides must use mode on
SW-A(config)# interface range GigabitEthernet0/1 - 4
SW-A(config-if-range)# channel-group 1 mode on

SW-B(config)# interface range GigabitEthernet0/1 - 4
SW-B(config-if-range)# channel-group 1 mode on

! WARNING: ON + active = incompatible / ON + desirable = incompatible
! Never mix static ON with LACP or PAgP modes
Layer 3 EtherChannel — Routed Port-Channel
Layer 3 EtherChannel configuration on a Cisco switch assigns an IP address directly to the Port-Channel interface and routes traffic rather than switching VLANs. This is the preferred design for distribution-to-core links and for connections that need to run OSPF across the bundle. It is also the required design for any EtherChannel connecting a multilayer switch to a routed core.
! Layer 3 EtherChannel configuration on Cisco switch — remove switchport, assign IP
SW-A(config)# interface range GigabitEthernet0/1 - 4
SW-A(config-if-range)# no switchport
SW-A(config-if-range)# channel-group 1 mode active
SW-A(config-if-range)# no shutdown

SW-A(config)# interface Port-channel 1
SW-A(config-if)# no switchport
SW-A(config-if)# ip address 10.1.1.1 255.255.255.252
SW-A(config-if)# no shutdown

! SW-B — mirror configuration
SW-B(config)# interface range GigabitEthernet0/1 - 4
SW-B(config-if-range)# no switchport
SW-B(config-if-range)# channel-group 1 mode active
SW-B(config-if-range)# no shutdown

SW-B(config)# interface Port-channel 1
SW-B(config-if)# no switchport
SW-B(config-if)# ip address 10.1.1.2 255.255.255.252
SW-B(config-if)# no shutdown

! Verify Layer 3 EtherChannel Cisco switch
SW-A# show etherchannel summary
Group  Port-channel  Protocol    Ports
1      Po1(RU)         LACP      Gi0/1(P)  Gi0/2(P)  Gi0/3(P)  Gi0/4(P)
! R = Layer 3 routed, U = in use

SW-A# show ip interface brief Port-channel 1
Interface    IP-Address   OK? Method Status  Protocol
Port-channel1 10.1.1.1    YES manual up      up
EtherChannel Load Balancing Configuration
The default load balancing method on most Cisco Catalyst switches is source MAC address (src-mac). This produces uneven distribution at distribution and core layers where most frames share the same source MAC (the upstream router or gateway). Tuning load balancing is an often-skipped step in EtherChannel configuration Cisco switch deployments that causes one link to carry 80% of traffic while others idle at 5%.
! Check current load balancing method on the Cisco switch
SW-A# show etherchannel load-balance
EtherChannel Load-Balancing Configuration:
        src-mac

! Change to src-dst-ip for distribution/core EtherChannel Cisco switch deployments
SW-A(config)# port-channel load-balance src-dst-ip

! Verify
SW-A# show etherchannel load-balance
src-dst-ip| Method | Hash Inputs | Best For |
|---|---|---|
| src-mac | Source MAC only | Access layer (default) |
| src-dst-mac | Both MACs XOR’d | Access layer improvement |
| src-dst-ip | Both IPs XOR’d | Distribution / core (recommended) |
| src-dst-port | L4 ports XOR’d | Multi-service high-throughput cores |
Verification Commands: show etherchannel summary Explained
The show etherchannel summary command is your primary diagnostic tool for EtherChannel configuration on a Cisco switch. Every engineer should be able to read its output cold and immediately know whether the bundle is healthy or broken.
! Primary EtherChannel verification command
SW-A# show etherchannel summary

Flags:  D - down        P - bundled in port-channel
        I - stand-alone s - suspended
        H - Hot-standby (LACP only)
        R - Layer3      S - Layer2
        U - in use

Group  Port-channel  Protocol    Ports
1      Po1(SU)         LACP      Gi0/1(P) Gi0/2(P) Gi0/3(P) Gi0/4(P)

! Reading the flags:
! Po1(SU) = Port-Channel 1 is Layer2 (S) and In-Use (U) = healthy bundle
! Po1(SD) = Port-Channel 1 is down = bundle not forming
! Gi0/1(P) = port bundled and passing traffic = correct
! Gi0/1(I) = port stand-alone = mismatch, not joining bundle
! Gi0/1(s) = port suspended = mismatch, actively rejected

! Detailed per-port EtherChannel information
SW-A# show etherchannel detail

! Trunk verification through the EtherChannel bundle
SW-A# show interfaces Port-channel 1 trunk
Port      Mode   Encapsulation  Status    Native vlan
Po1       on     802.1q         trunking  99

! LACP neighbor information
SW-A# show lacp neighbor

! PAgP neighbor information
SW-A# show pagp neighbor
EtherChannel and Spanning Tree Interaction
Understanding how EtherChannel configuration on a Cisco switch interacts with STP is essential for production deployments. Spanning Tree sees the EtherChannel as a single logical link — Port-Channel 1 — not four individual links. This means STP does not block any member links within the bundle, all physical links carry traffic simultaneously, and a single member link failure does not trigger an STP topology change.
no shutdown.For VLAN trunks carried over EtherChannel on a Cisco switch, configure all VLANs and native VLAN on the Port-Channel interface only — never on individual member ports.
Real-World Case Study
A mid-sized manufacturing firm in Lahore with a 250-user campus came to us with intermittent slowness during morning shift changes. The access switch on floor 3 connected to the distribution switch via a single 1 Gbps uplink saturating at 950+ Mbps during peak login traffic.
The fix was a four-member LACP EtherChannel configuration on both Cisco switches, deployed during a 30-minute maintenance window. Interfaces were cleaned (Phase 1), channel-group assigned with LACP active mode (Phase 2), Port-Channel trunk configured for VLANs 10, 20, and 30 (Phase 3), and load balancing changed to src-dst-ip.
After the EtherChannel configuration Cisco switch change, peak uplink utilisation dropped from 95% to 22%. Login times during shift change dropped from 45 seconds average to under 12 seconds. The thing that surprised us during deployment: two of four links initially showed the I (stand-alone) flag despite correct channel-group assignment — a stale VLAN 10 access assignment on Gi0/3 set months earlier. One no switchport access vlan command brought all four into the bundle immediately. This is exactly why Phase 1 cleanup is non-negotiable.
Troubleshooting EtherChannel Configuration Cisco Switch Issues
When EtherChannel configuration on a Cisco switch fails, it falls into one of five categories. Work through them in order — the first two cover 85% of all failures.
Issue 1: Port Shows (I) Stand-Alone — EtherChannel Not Forming
Symptoms: show etherchannel summary shows member ports with I flag instead of P.
Root cause: Parameter mismatch in the Cisco switch EtherChannel — speed, duplex, trunk mode, allowed VLANs, or native VLAN differ between member ports or between the two switches.
! Identify the mismatch
SW-A# show etherchannel 1 detail
! Look for lines beginning with: Mismatch:

! Fix — align speed and duplex on all member ports
SW-A(config)# interface range GigabitEthernet0/1 - 4
SW-A(config-if-range)# speed 1000
SW-A(config-if-range)# duplex full

! Verify EtherChannel configuration Cisco switch is now healthy
SW-A# show etherchannel summary
Prevention: Run show interfaces [range] status before assigning ports to any channel-group. Confirm identical speed and duplex on all candidate ports.
Issue 2: Incompatible Mode — One Side ON, Other Side LACP
Root cause: Mode mismatch in Cisco switch EtherChannel configuration. Static ON never sends LACPDUs and will never form with a LACP peer.
! Check protocol on both sides
SW-A# show etherchannel 1 summary | include Protocol
SW-B# show etherchannel 1 summary | include Protocol

! Fix — remove and reconfigure with aligned modes
SW-A(config)# interface range GigabitEthernet0/1 - 4
SW-A(config-if-range)# no channel-group 1
SW-A(config-if-range)# channel-group 1 mode active

SW-B(config)# interface range GigabitEthernet0/1 - 4
SW-B(config-if-range)# no channel-group 1
SW-B(config-if-range)# channel-group 1 mode passive
Issue 3: One-Sided EtherChannel Creating a Layer 2 Loop
! Detect broadcast storm from one-sided EtherChannel
SW-A# show spanning-tree detail | include changes
  Number of topology changes 847 last change occurred 0:00:08 ago

! Immediate fix — shutdown the unconfigured side first
SW-B(config)# interface range GigabitEthernet0/1 - 4
SW-B(config-if-range)# shutdown

! Then complete the EtherChannel configuration on SW-B
SW-B(config)# interface range GigabitEthernet0/1 - 4
SW-B(config-if-range)# channel-group 1 mode active
SW-B(config-if-range)# no shutdown
Issue 4: All Traffic on One EtherChannel Link
Root cause: Load balancing set to src-mac with most traffic from one source MAC on the Cisco switch EtherChannel.
SW-A(config)# port-channel load-balance src-dst-ip
SW-A# show etherchannel load-balance
Issue 5: EtherChannel Not Forming After IOS Upgrade
Root cause: LACP timer rate mismatch post-upgrade. One switch sends slow PDUs (30s), the other sends fast (1s).
! Check LACP timer rates
SW-A# show lacp internal
! S = Slow (30s), F = Fast (1s) — must match on both switches

! Align to fast on both sides
SW-A(config)# interface range GigabitEthernet0/1 - 4
SW-A(config-if-range)# lacp rate fast

SW-B(config)# interface range GigabitEthernet0/1 - 4
SW-B(config-if-range)# lacp rate fast
EtherChannel Configuration Best Practices
Design and Planning
Always use LACP for new EtherChannel configuration on Cisco switches. IEEE 802.3ad is the open standard supported by every modern networking vendor. PAgP locks your EtherChannel to Cisco-only hardware on that link forever — a hardware refresh constraint that costs money.
Use even numbers of member ports. EtherChannel configuration on a Cisco switch supports 2, 4, or 8 member ports. Odd numbers create asymmetric hashing due to XOR-based hash distribution properties — one link always carries more flows than the others.
Connect member ports to different ASICs or line cards. On modular chassis switches, distributing EtherChannel members across line cards ensures a single card failure does not drop the entire bundle. This hardware-level redundancy consideration is rarely documented but critical in production.
Configuration
Configure all trunk and VLAN settings on Port-Channel, never on member ports. This is the single most important rule in EtherChannel configuration on a Cisco switch. Any VLAN configuration directly on a member port creates a parameter mismatch that suspends that port from the bundle.
Use channel-group mode active on both sides. Active/active LACP EtherChannel configuration ensures both Cisco switches initiate negotiation immediately, shortens formation time, and makes the configuration symmetrical and easy to audit.
Set src-dst-ip load balancing on all distribution and core EtherChannel switches. The default src-mac creates severe traffic imbalance at layers where many flows share a common upstream MAC address.
Operations and Monitoring
Monitor per-member link utilisation on your EtherChannel configuration Cisco switch, not just Port-Channel totals. A Port-Channel showing 40% utilisation might have one member at 80% and three at under 15% — a load balancing problem that causes drops under load with no obvious indicator.
Include show etherchannel summary in every post-change checklist. After any switch configuration change, VLAN modification, or IOS upgrade, run this command immediately. Mismatches introduced by other changes silently suspend member ports and reduce effective bandwidth without any alert.
Document the negotiation mode and channel-group number in your network diagram. Knowing that Po1 uses LACP active/active on Gi0/1–0/4 with native VLAN 99 eliminates 10 minutes of reconnaissance at 3am during an outage.
Security Considerations
Native VLAN alignment is mandatory on EtherChannel trunk ports. Mismatched native VLANs between Cisco switch EtherChannel trunk ports create a VLAN hopping exposure. Always explicitly configure switchport trunk native vlan [id] on the Port-Channel interface and verify with show interfaces Port-channel 1 trunk.
Restrict allowed VLANs on all EtherChannel trunk links. Use switchport trunk allowed vlan [list] to permit only the VLANs that legitimately need to traverse the link. The default all passes every VLAN including management VLANs to every downstream switch — a significant lateral movement risk in any breach scenario.
Apply LACP system priority for controlled bundle membership. Configure lacp system-priority 100 on your Cisco switches to ensure your infrastructure wins LACP negotiation control. An unauthorised device with default priority (32768) attempting to join an EtherChannel bundle will be outbid and excluded.
Disable EtherChannel on all unused port groups. Apply no channel-group and shutdown to any interface range not actively participating in a configured EtherChannel bundle.
FAQ — People Also Ask
What is the difference between LACP and PAgP in Cisco EtherChannel?
LACP (IEEE 802.3ad) is an open standard for EtherChannel configuration on Cisco switches and all other modern vendors, using mode active or passive. PAgP is Cisco proprietary, using mode desirable or auto, and only works between Cisco devices. Use LACP for all new EtherChannel configuration Cisco switch deployments. Both provide negotiation keepalives that static ON mode lacks entirely.
Why is my EtherChannel not forming on a Cisco switch?
EtherChannel configuration on a Cisco switch fails most often due to parameter mismatches between member ports — differing speed, duplex, trunk mode, allowed VLANs, or native VLAN. Run show etherchannel detail to see the exact mismatch. Also verify both sides use a compatible mode: LACP active/passive, PAgP desirable/auto, or both sides ON. Mixing LACP with static ON always fails to form a bundle.
How do I verify EtherChannel is working on a Cisco switch?
Run show etherchannel summary. A healthy EtherChannel configuration on a Cisco switch shows SU flags on the Port-Channel interface and a P flag on every member port. Any member showing I (stand-alone) or s (suspended) indicates a parameter mismatch. Follow with show etherchannel detail to identify exactly which parameter is causing the issue.
Does EtherChannel double the bandwidth between Cisco switches?
EtherChannel configuration on a Cisco switch multiplies aggregate bandwidth by the number of member links but does not double throughput for a single flow. A single TCP session travels on one member link determined by the hash algorithm. Aggregate bandwidth gains are realised across many concurrent flows — four 1 Gbps links deliver up to 4 Gbps aggregate for mixed multi-flow traffic.
What happens to Spanning Tree when EtherChannel is configured on a Cisco switch?
Spanning Tree sees the EtherChannel configuration as a single logical Port-Channel link, not multiple physical links. STP does not block individual member ports within a functioning EtherChannel bundle on a Cisco switch. Only a complete Port-Channel failure — all members going down simultaneously — triggers an STP topology change notification.
Related Articles
- VLAN Configuration Cisco Switch Step by Step — EtherChannel trunk ports carry VLANs; configure allowed VLANs and native VLAN on the Port-Channel interface after completing EtherChannel configuration.
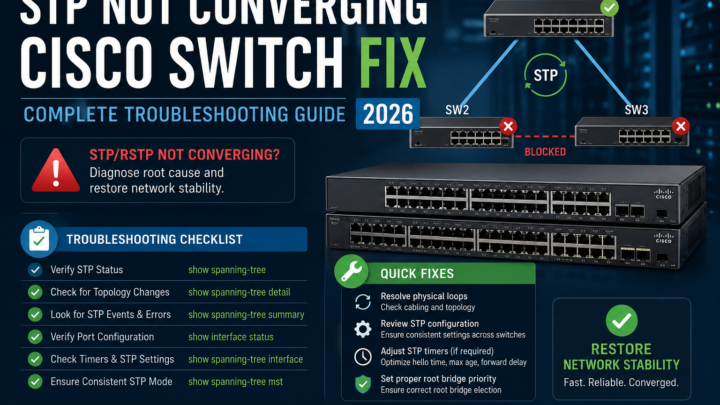
- STP Not Converging Cisco Switch Fix — EtherChannel appears as a single link to STP; understanding this prevents misdiagnosis of topology change storms caused by partial EtherChannel configuration.
- Network Troubleshooting Guide 2026 — EtherChannel misconfiguration on a Cisco switch is a leading cause of intermittent network outages; this guide covers the full OSI-layer diagnostic methodology.
- Cisco ASA Configuration Guide — Enterprise ASA deployments commonly use EtherChannel for uplink redundancy to distribution switches.
- OSPF Configuration Cisco Router Step by Step — Layer 3 EtherChannel port-channels are routed interfaces; OSPF runs directly on Port-Channel interfaces in routed-access designs.
Conclusion
EtherChannel configuration on a Cisco switch is one of the highest-value, lowest-risk changes an engineer can make to an existing campus network. The EtherChannel configuration Cisco switch commands themselves take under 15 minutes; the knowledge required to deploy without creating a loop or outage is what this guide has provided.
Plan before you touch: Verify identical speed, duplex, and VLAN parameters on all member ports before assigning any channel-group. One mismatched port suspends the entire EtherChannel bundle with no alarm and no error message.
Use LACP active/active for all new EtherChannel configuration Cisco switch deployments. It is the IEEE standard, works across vendors, and provides negotiation keepalives that static ON mode never will. There is no production scenario where ON mode is the better choice.
Configure Port-Channel first, members second: Set all trunk, VLAN, and IP configuration on the Port-Channel interface. Member ports in Cisco IOS inherit from it. Per-port configuration creates mismatches that silently degrade the EtherChannel bundle.
Verify with show etherchannel summary: The P flag on every member port and SU on the Port-Channel is the only confirmation that matters. Always tune load balancing to src-dst-ip at distribution and core EtherChannel configuration Cisco switch deployments for even traffic distribution.
Need Expert Help with Cisco Switch EtherChannel Configuration?
I provide professional network design and deployment services for businesses across Pakistan and internationally. Whether you need an EtherChannel configuration review, a full campus switch deployment, or emergency troubleshooting of a bundle that won’t form — I can help remotely within hours.
- Cisco switching — EtherChannel, VLANs, STP, QoS
- Campus and branch network design and deployment
- Azure and AWS cloud networking
- Cisco routing — OSPF, BGP, EIGRP
- CCNA/CCNP lab guidance and mentoring
Email: itexpert@navedalam.com
WhatsApp: +92 311 935 8005
Website: navedalam.com
Free 30-minute consultation — no obligation.
Naveed Alam is a certified Network and Cloud Engineer with hands-on experience designing and deploying enterprise switching infrastructure. He holds CCNA, AZ-900, and CompTIA A+ certifications and has completed 50+ network projects including EtherChannel configuration on Cisco switch deployments for campus networks up to 1,000+ users.
LinkedIn · navedalam.com · itexpert@navedalam.com